
I am about to venture into the world of parenting more than one child at a time. I am SUPER excited for our new baby girl, and I'm the teensiest bit nervous about how I will successfully nurture, love, encourage, support, teach, discipline, and treasure two children at one time. People have been doing it for tens of thousands of years, so I know that it is possible, but it seems like a big charge. Life is going to change, and I'm doing my level best to get ready.
What things did you wish you knew before your second child joined your family? How did you prepare (yourself, your marriage, your older child) for the transition? What were some unexpected joys you found during that season? I love hearing from other moms, so if any of these questions strike a chord with you, sound off below!
Can't wait to share some pics of M's big girl room and Baby E's nursery with you soon! Things are coming together, people!
Monday, June 15, 2015

Friday, June 5, 2015
Big Announcement!
If you follow me on Instagram, you saw that we are expecting Baby No. 2! I'm so excited for the little bundle, and am excited to share this journey with you.
While our Our families and some close friends had known the news for a while, we decided to wait a while to spread the news en mass this time around. We announced the baby right before our gender reveal party, and are excited to share the latest with you now!


And now, for my favorite part: the big reveal! We are beyond excited to announce that we will be having a baby...


We are so thankful for this tremendous blessing in our lives, and can't wait to have two little girls to call our own! My heart is full.
While our Our families and some close friends had known the news for a while, we decided to wait a while to spread the news en mass this time around. We announced the baby right before our gender reveal party, and are excited to share the latest with you now!

Since we only had a couple weeks lead time, I whipped up this quick invite and emailed it to family. Email invites are never my first choice, but it definitely worked with a tight schedule.


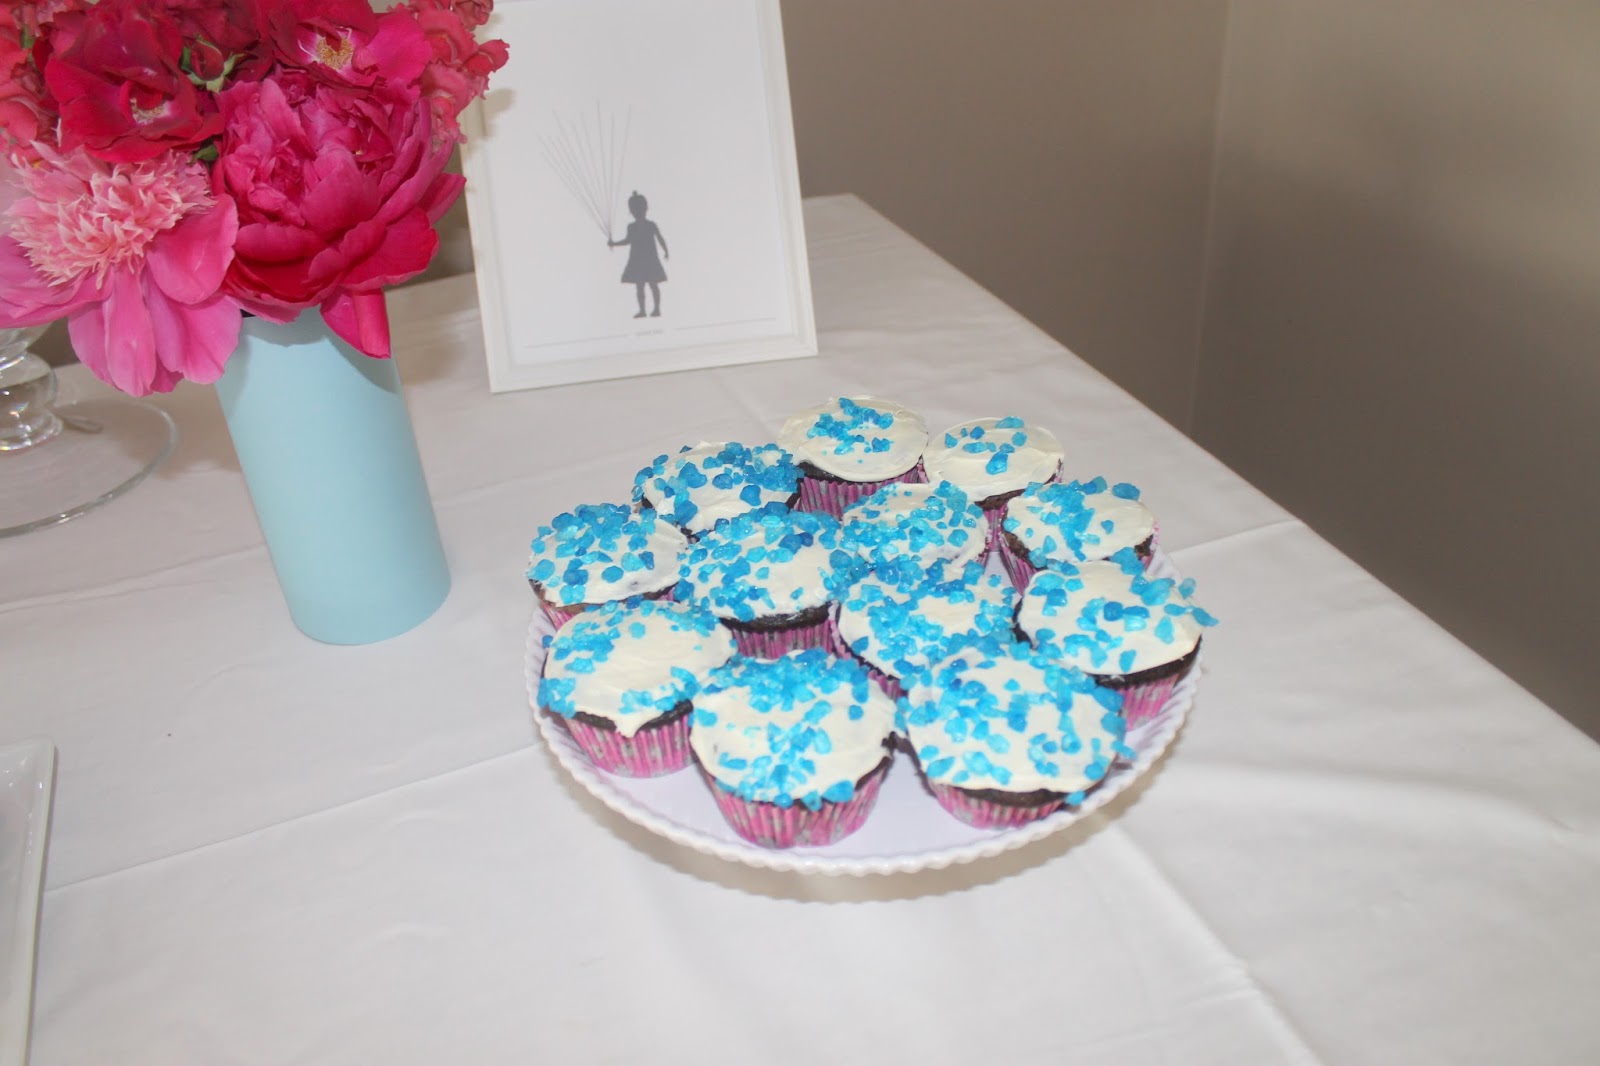
Our little dessert table, with little accents of pink and blue.

We kept things easy with a small dessert bar, with shortcut cupcakes that I made earlier in the week and stored in the freezer until the morning of the party.

Because it's not the easiest task to find blue flowers, I decided to wrap plain cylinder vases with blue paper and fill them with pink flowers. Extra bonus -- I found all these flowers in my parents' yard, so they were free!


My gorgeous friend Erin at Printed Moon made these adorable art prints for the party. Guests stamp a thumbprint with pink or blue ink to create a special piece of art for the new baby's room.

And now, for my favorite part: the big reveal! We are beyond excited to announce that we will be having a baby...

GIRL!!!!!!

We are so thankful for this tremendous blessing in our lives, and can't wait to have two little girls to call our own! My heart is full.
Thursday, April 2, 2015
Quick and Easy Easter Gift
I love Easter -- it is a day full of celebration, joy and hope. Jesus is risen! I do my best to celebrate Easter for what we believe it to be: a joyful celebration of the gift of life through Jesus. When I was in 3rd grade, my teacher helped us create a really cool craft to commemorate the story of Easter. It is meaningful and I still have it to this day. Next year, I'm planning on recreating it with my daughter, and I am excited to share it with you then, too!


While we aren't really "Easter bunny" people, we do enjoy some other Easter traditions, like brunch and egg hunts with my daughter and all our nieces and nephews. I love putting together the kids' Easter gifts each year, but I often feel "stuck", searching for some type of creative gift to give to the grown-ups. After a bit of brainstorming, I came up with an idea that I totally love this year:
Herbs in monogrammed pots.
This project is so simple, and it is really reasonably priced. If you're in need of some inspiration, I hope you find this as fun as I did!
Monogrammed Pots
What you need:
- One 4" terra cotta pot
- Chalk paint in your favorite color (I used Folk Art brand in light grey from JoAnn)
- Paint pen (or large letter stickers if you aren't sure about attempting your own hand-lettering)
- One 4" herb (I used rosemary because I love the look and smell)
Directions:
- Paint the outside of your pot with your chalk paint. My pots required two coats for consistent coverage. Check the instructions on your paint on how long to allow the paint to dry between coats.
- After all coats are completely dry (I let mine dry overnight), use your paint pen to hand-letter your desired monogram on the pot. I ended up doing two coats with the paint pen as well.
- Transfer plant into your pot, and you're done!
The Breakdown:
- Chalk paint: $6.99 at JoAnn
- 4" pot: $1.79 at JoAnn
- Paint pen: $3.49 at JoAnn
- Rosemary plant: $3.78 at Home Depot
Total cost per potted plant: $7.07 +tax
I hope you and your family have a wonderful Easter! He is Risen, Indeed!
Monday, March 9, 2015
And One Slightly Less Beautiful Weekend...
Well guys, I'm sorry! After a week of feeling pretty sick myself, my little love bug got a stomach virus and we closed our weekend with some not so pleasant stuff. Prayers appreciated that she gets better soon. She is usually a ball of energy, but today she's pretty wiped out.
I'm hoping to get back to some fun projects on the blog this week. Until then, I hope you and yours stay healthy this week!
I'm hoping to get back to some fun projects on the blog this week. Until then, I hope you and yours stay healthy this week!
Monday, March 2, 2015
A Beautiful Weekend


Tuesday, February 24, 2015
Mudroom-less in Seattle
Contrary to popular belief, it doesn't rain constantly in Seattle. Today, it is actually gorgeous -- bright sun with warm (for February) temperatures. My little lady and I spent much of our afternoon drawing with sidewalk chalk in our backyard. It has been lovely.


I love storage solutions that make life easier! What would you love to tackle in your home?
One adjective I would use to describe Seattle fall/winter/spring weather? Damp. It doesn't always rain, but there are tons of days where that cloud cover never really goes away, and the ground stays dewy and muddy all day long. And, since we don't wear shoes in our house (for obvious reasons), we needed a good storage solution for our shoes that would work in spite of our lack of a mudroom.
Enter this lovely built in shoe shelf in our garage. It.is.perfect. The size and scale work well with our shoes, the location is convenient, and the surfaces are easy to wipe down.
My daughter's feet are still quite tiny, so I get an extra shelf or two to house my shoe collection. As she grows, I will need to find another spot for some of my boots.
It is important to keep depth in mind when choosing a shelving unit. My husband wears a size 12, so we needed enough depth to keep his shoes from falling out or overhanging the edge of the shelf too much. Our built-in is about 12.5" deep, so his shoes each overhang buy about a half inch.
My tiny size 5.5 shoes fit almost anywhere, but we did need to keep in mind the height of my taller shoes to make sure everything would fit. We installed adjustable shelving, so we can move things around as needed.
Our family was able to add this built-in shelving to our garage layout when we decided to hang sheet rock a few years ago, and I know the idea of doing a built-in (especially when you are not already knee-deep in renovation dust) isn't always appealing. So, I have found a few awesome shelving ideas that will fit the bill, without a hefty construction bill.
This is a great option for those with smaller feet. Adjustable shelves are always a plus, but with a depth of 11", it won't work as well for larger shoe sizes.
I love the idea of this unit with a cute cushion on top to serve as a place to put on/take off shoes.
This is a great piece for those interested in storing a few types of things together. Need a place to keep keys? Backpacks? Dog walking gear? Use a few shelves for shoes and buy some baskets to hold the other stuff. It will still be convenient to access, but tucked away for a tidy look.
This piece has great potential for small spaces and kid storage solutions. With a narrow depth of only 9.5", it won't accommodate most adult shoes. However, it could be a great catch all space for kids. Leave the bottom shelves out and add a big basket for umbrellas. Add hooks to the back for rain coats and backpacks. Shoes can go on higher shelves, and all that mess will never make it into your house!
Friday, February 20, 2015
Vintage Ski 1st Birthday Party
A couple months ago, my adorable twin nephews turned one! They are such a wonderful addition to our family, and it is such a blessing to have them in our lives.


My sister let me help in the planning process, and I loved every minute of it. She wanted a party them that was unique, but classic so we settled on a "Vintage Ski" theme. Luckily, my dad is a ski enthusiast, so we had lots of decorations already at our disposal. After commissioning some adorable custom invitations from Printed Moon, we finalized the details of the party. The guest list was large, so they opted to rent a space for the party instead of hosting at home. Everything turned out really well!
The invitation (which was also enlarged to poster size to use as a decoration and signage for the party guests).
The event space: A local community center with great natural light. There were gorgeous trees outside the main window, which fit in perfectly with the winter-y theme.
Vintage ski theme - complete with old wooden skis, vintage snow shoes, lots of lighted trees, and a custom-built arbor with icicle lights.
White lantern centerpieces, surrounded by a mixture of real and faux alpine greenery. All the real greens were cut from my parents' yard, so there was no expense!
Monthly pictures of the twins, framed and displayed.
Cupcakes on tiered boxes, made to look like a mountain. We also incorporated individual cakes for each boy, with vintage ski style ornaments as cake toppers.
Since there were a lot of kids in attendance, they had a designated play area to keep little ones entertained.
A few extra touches to complete the theme, like bundled birch branches on the window sills.
Thanks to the talented Catherine Gaul for the great party photos. I am so lucky to have these handsome twins in my life, and I can't wait to start planning their second birthday ;).
Thursday, February 12, 2015
Fake It 'Til You Make It
If you follow me on Instagram, you may have seen the cheery buds I picked up at my local farmer's market over the weekend. They were lovely -- yellow daffodils with lavender tinted wheat. But, the daffodils started to wilt, and the whole arrangement started looking pretty tired by today. Instead of tossing the whole thing, I decided to add some Valentine color to make it more festive for our family party this weekend.


Here's my big secret: I added a fake flower. After looking around my house a bit, I found a big, pretty fake peony in a box, and decided to add it to the arrangement. I also had some gerbera daisies that were pretty old. Two of the five were wilting, but the remaining three were in good shape, so I borrowed those to add more color. Finally, I grabbed a small bundle of red tulips at the store ($3 for 5 stems) and used three of them to finish off the look. I'm super happy with it, and with increased floral costs at Valentine's Day, I think this pretty little thing could sell for at least $30!
The Breakdown:
Greens: Part of the original arrangement, no new cost
Wheat: Part of the original arrangement, no new cost
Tulips: $1.80
Gerbera Daisies: From last week's flowers, no new cost
Peony: Already had, no new cost (sells at JoAnn for about $5).
Total New Cost: $1.80
Monday, February 9, 2015
My Favorite Kids' Valentine Looks
Each year our daughter "hosts" a small Valentine's Day party for her grandparents at our house. We love celebrating them, and I love finding a cute outfit for her to wear. This year there were so many cute baby fashions, and I wanted to share some of the best deals with you!
For girls:
Here is what my little lady will be wearing to celebrate Valentine's Day this year.
Source: Old Navy

For girls:
Here is what my little lady will be wearing to celebrate Valentine's Day this year.
Source: Old Navy


Here is a little twist on the traditional red or pink. I love the sweet coral and gold, and I love that it is all on sale.
Source: Crazy8


Ruffles and lots of girly charm in this cute little outfit.
Sources: Old Navy and Crazy8


For boys:
This is my favorite look, it is well put together but comfortable to play.
Source: Old Navy


Great for a casual day at home, but still festive and fun.
Source: Old Navy


Simple and easy - items your little man may already have in his closet.
Source: Old Navy


Subscribe to:
Comments (Atom)


